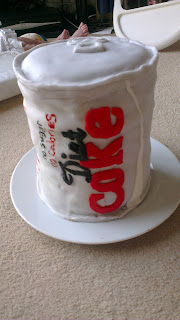
I received an order for this cake as someone's birthday was approaching. The brief was to create a chocolate cake in the shape and design of a diet coke can. This is probably the strangest request I've had so far but I set about doing my research. First job.. send Gary down to the Co Op to buy me a can of diet coke to use as my guide!!
I decided that in order to create the tall cylinder I needed to bake 3 cakes in the smallest tin I had, this was a 6" tin. I had to work out the quantities from previous cakes and here is the list I came up with, this was slightly too much mixture for the 3 cakes but I preferred having a little left over as back up so I would stick with this quantity in the future.
Ingredients:
500g Plain chocolate
500g Unsalted Butter
500g Plain Flour
75ml Coffee
2tsp Vanilla Essence
1tsp Baking Powder
1tsp Bicarbonate of Soda
715g Light Brown Sugar
8 Eggs
426ml Soured Cream
Method:
Melt together the chocolate and the butter over a low heat. Add the vanilla essence and coffee and leave to cool slightly.
Mix together the soured cream and eggs.
Place the flour, sugar, baking powder and bicarbonate of soda in a large bowl. Make sure there are no lumps in the sugar.
Add the chocolate mixture to the flour along with the egg mixture. Stir it all together until fully combined.
Spoon some of the mixture into a greased 6" tin until around 3/4 full. Place in the oven, 150oC, for 1hour30 minutes. The top of the cake should feel firm to touch and spring back slightly. If there is no resistence when pressing the cake needs slightly longer in the oven.
Leave to cool in the tin for several hours. Run a knife around the outside and carefully remove.
Bake the remaining 2 cakes in the same way.
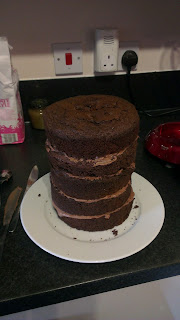
Once the cakes had cooled I made some chocolate buttercream and stacked the cakes up on top of each other.
 |
| Stacked cakes |
I then covered the cake in chocolate buttercream around the outside as well. I added a tiny amount of black colouring to some white icing to make it a very slight grey colour. This was the closest I could get to silver. I covered the whole cake with this icing. This step was challenging due to the size of the cake, when I tried to attached the icing it kept ripping and falling apart. In the end I had to do it in several sections and try and rub them together. It didn't create a great base for the cake and this is probably the thing that let it down the most.
I printed off some logos from the internet and cut these out as templates for the lettering.
 |
| Paper templates |
Using red and black icing I cut out the letters and stuck them on the side of the cake. I also cut a white strip and place this up the side as well.
 |
| Coke Lettering |
Of course this is a diet coke can so I needed to cut out the D. I found out the easiest way to keep the shaping was to cut the letters and pull the outside icing around from the letters rather than trying to prise the letters out.
 |
| D for Diet |
The newest coke cans now have letters on them so to personalise the cake for the birthday lady I decided to put her name on the outside as well.
 |
| Share with Wendy |
To finish the cake off I painted some lines on the side to represent the small lettering on the side. There's no way I could write all the detail and hopefully this gives the representation of the ingredients etc. I also used some left over silver icing to create a rim on the cake and a ring pull on the top.
Here are some pictures of the cake from all angles.
 |
| Side 1 |
 |
| Side 2 |
 |
| Side 3 |
 |
| Side 4 |
 |
| Top view |
I was fairly happy with the cake but as usual there is much room for improvement and many things I didn't think were great. I'm looking forwards to learning some tips so I can further improve my cakes and make them much better.
If you're interested in ordering a cake from me, I'm currently doing them for just the cost of the ingredients (August 2013). This cake was £20. I can produce cakes for people in the Sussex area and also London if given enough notice.
No comments:
Post a Comment